Minggu, 09 Agustus 2009

Add Clock Gadget

23 komentar
jamThis is very easy because of facilities already provided by this blogger so we choose to live alone sengihnampakgigi. For those who want to try, please follow the steps below:

1. Login to Blogger. Click the Layout menu and then click Fonts and Colors. There are some elements that you can set, such as:

* Page Background Color: Changing the background color outside the template
* Main Background Color: Changing the background color of the template
* Text Color: Changing the text color posting / article
* Blog Title Color: Changing the color of the blog title
* Blog Description Color: Changing the color description blog
* Post Title Color: Changing the color of post title
* Date Header Color: Changing the text color on
* Border Color: Changing the color of the edge templates
* Sidebar Title Color: Changing the color of the title in the sidebar such as text Archive Blog, Blogroll, Labels, and other
* Link Color: Changing the color of text links are placed
* Visited Link Color: Changing the text color when a link directing visitors to the cursor on the link
* Sidebar Link Color: Changing the color of text links are placed in the sidebar
* Sidebar Visited Link Color: Changing the text color when a link directing visitors to the cursor on the link located in the sidebar
* Text Font: Changing the form of letters / text on the posting
* Sidebar Title Font: Changing the title in the form of a letter column sidebar
* Blog Title Font: Changing the form of letters the blog title
* Blog Description Font: Changing the form of letters blog description
* Post Footer Font: Changing the footer on the form of a letter post. For example: posted by, posted by

That is some of the basic elements of the most frequently found in the blogger template. Each template has elements that vary. Please try your own with menggonta-color change.

2. If you are living then click Save Changes color template akan bJam than as a function of time can also be used as accessories for the blog. With hours to install, our blog will look more professional and alive.

For your more important content look better than no installation because akan slow page loading on your blog. But for those who prefer the appearance of the blog, no one is to install the accessories.

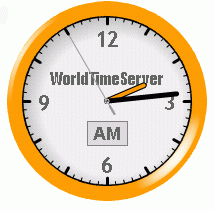
Many services that provide accessories such as free minutes timeanddate.com, clock4blog.eu, clocklink.com, widgetbox.com and many more. At the time this post I will talk about installing the analog days of World time server. Because this service can provide a more accurate color and a lot of options you can select according to taste.

To install, please follow the steps below:

1. Visit http://www.worldtimeserver.com/clocks
2. Select one of the analog days you want by clicking the link below each picture
3. Then you will enter kehalaman kustomasi like this:


# Clock Color: Select color according to your taste and templates
# Size: Select the size you want
# Location: Choose your location
# Name City: Fill your city name. This is optional. If you do not want to live emptied aja

4. If you have, click the Update HTML Code
5. Copy the code in the Object HTML Code
6. Open blogger. Click the Layout -> Page Elements
7. Click Add a gadget. Click the + button on the HTML / Javascript
8. Pastekan code in the box and click Save
9. Done. Please click View to see the blog looks

Change in accordance with your wishes. Then, click View Blog to see.

If you want to restore the original template to form. Living click Revert to the default template and click Save Changes. Done.

After that I try to have some modern template which can not use this facility. So do not panic if you use a template that does not support this facility.

Change Font and Color

1 komentar
This is very easy because of facilities already provided by this blogger so we choose to live alone sengihnampakgigi. For those who want to try, please follow the steps below:

1. Login to Blogger. Click the Layout menu and then click Fonts and Colors. There are some elements that you can set, such as:

  • Page Background Color: Changing the background color outside the template
  • Main Background Color: Changing the background color of the template
  • Text Color: Changing the text color posting / article
  • Blog Title Color: Changing the color of the blog title
  • Blog Description Color: Changing the color description blog
  • Post Title Color: Changing the color of post title
  • Date Header Color: Changing the text color on
  • Border Color: Changing the color of the edge templates
  • Sidebar Title Color: Changing the color of the title in the sidebar such as text Archive Blog, Blogroll, Labels, and other
  • Link Color: Changing the color of text links are placed
  • Visited Link Color: Changing the text color when a link directing visitors to the cursor on the link
  • Sidebar Link Color: Changing the color of text links are placed in the sidebar
  • Sidebar Visited Link Color: Changing the text color when a link directing visitors to the cursor on the link located in the sidebar
  • Text Font: Changing the form of letters / text on the posting
  • Sidebar Title Font: Changing the title in the form of a letter column sidebar
  • Blog Title Font: Changing the form of letters the blog title
  • Blog Description Font: Changing the form of letters blog description
  • Post Footer Font: Changing the footer on the form of a letter post. For example: posted by, posted by

That is some of the basic elements of the most frequently found in the blogger template. Each template has elements that vary. Please try your own with menggonta-color change.

2. If you are living then click Save Changes akan template color change according to your wishes. Then, click View Blog to see.

If you want to restore the original template to form. Living click Revert to the default template and click Save Changes. Done.

After that I try to have some modern template which can not use this facility. So do not panic if you use a template that does not support this facility.

Change Blog Template

1 komentar
You first download the template that matches the theme of your blog, if not download here. Then the following steps to change the blogger template.

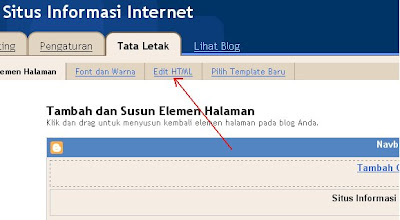
1. Log in and to the blogger dashboard, click the Layouts / Layout.


2. Click Edit HTML


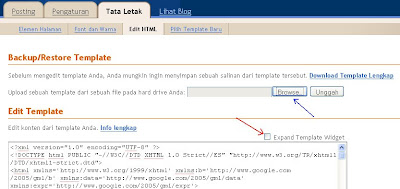
3. Check columns Expand widget templates (red arrow). Then click Browse to take the results of a template that you download (blue arrow)


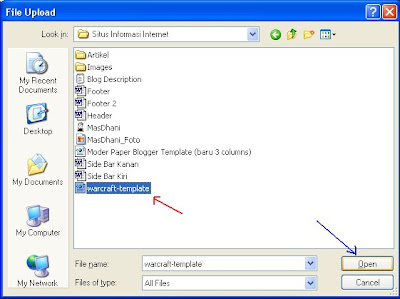
4. Select the template you want to use, click open.


5. After the image appears, click the upload / upload and wait for a few seconds.


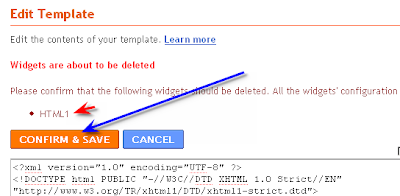
6. Usually the replacement of a new template will erase some of the existing widgets, so before changing the template, the template back up and widgetnya long way: Download the template first time you click the "Download Full Template" and the second over your copy of each script HTML widget-widget from your blog to Microsoft Word. Ok followed the tutorial, after step 5 will generally appear under the image like this, they have requested approval to remove the widget. Click aja CONFIRMED AND SAVE.


7. And the result like this.

Learn Make a Blog

0 komentar
REGISTRATION:
# You must have email account in GMAIL.COM
# If you can not have a list in the first GMAIL.COM Or,

You can direct your learning to use the exercise below:

Domain Users: http://user.blogspot.com

Advantages:
~ You can make more than 1 blog with 1 acount.
~ Layout can be changed.
~ Acount in Gmail (if enabled).
~ Akan Automatic entry in the Search Engine GOOGLE.

A. REGISTER:

If you do not have any in the acount BLOGGER.COM, you can start from here, namely how to apply ....

1. Create Your Blog Now
Open the browser window, open the blogger.com site (click on the link beside)
Select the key that there is any posts CREATE YOUR BLOG NOW on the web page (which is be surrounded in the image below).


2. Fill Form
Fill out the form completely, then press Continue (to be surrounded in the image)

3. Select Domain Blog
Fill title blogging, and then fill out the form your blog address (URL) to open a blog if you are finished.
For example, I create a domain http://bantuanbelajar.blogspot.com, means in the form to be filled two bantuanbelajar.
In the third form, fill in the existing code in the image on top of it (picture a mix of numbers and letters, which marked the box on the image).
Continue and then (be surrounded on the picture)

4. Choosing a Template
Select the template that you like. Template is provided in a standard template on Blogger.Com. If you want to be able to change the admin page acountmu (akan at the criticism on the back).
Select the template in love with how to give a period (.) At the bottom of the template image (an image that be surrounded), and then continue.

B. POST

Congratulations, you have a blog ... ..
You start to live on the blog you write ....
[+] After choosing a template, then you will go to a page that bertiliskan:
Your blog has been created!
You stay pressing START POST (which is be surrounded in the image)

[+] If you have an acount, you live only in the login page.
Then you select the image + (marked with a circle) to write a new posting.
If you want to create a new blog, do not need to register again, because for some blogs, just 1 acount can, namely by pressing the button CREAT A BLOG (pictures are given in the arrow).

[+] Start posting content that you will write, from the post title, also posting the content. Above the posting was available tool - the tool style for any posts, both want the text italic, or bold, and so forth ....
To display the image on the post content, can use the following code ...

http://geocities.com/user/gambar.jpg ">

in the code above, the bold text is the location of the image file is located.
For those who have a Yahoo ID can get free hosting in geocities to put the image file or other files, that is certainly the way ... register.
Or can also search in Google, or at any site.
To know the location (location) image file on another site that is right-click on the image, select properties, there will come out image information, from the size, type, location of the picture also ...
Take the Address [URL], put in before the tag ....

After posting is complete, the living mem-kannya publishing, the press Publish POST, or that the circle in the image below ...

*) Then press the button republish entire BLOG, after that press the button republish INDEX ONLY.

C. EDIT / erase POST
If you want to edit or remove the posting, select the menu EDIT POST (which is given circle in the image)

After the edit, or delete, repeat steps *) (above).

D. TEMPLATE
To change the template, or add the tool in the blog, choose the menu TEMPLATE (which be surrounded in the image below). Akan seen posted on these code-code, the HTML tags from blogging. About how to change my template akan investigation in the future ....
E. VIEW RESULTS
TEMPLATE right next to the menu, there is a menu VIEW BLOG, right-click menu, select Open in New Window.
 

Learn Blog Site Copyright 2009, Designed by K03t1l Templates's Notez